
 Hello everyone!!! I am hosting the Technique Lover's Challenge again on Splitcoaststampers and I have a super fun technique for you today!!! It's something that I developed a while ago for silhouette stamps...ya know those solid stamps that are so hard to get ink to cover evenly!! I decided to try and make a plaid look by tapping the edge of the ink pad in a spaced pattern first going from left to right and then to flip the stamp and go from right to left.
For the leaf stamp I first stamped a base color of Mustard Seed over the whole stamp.
 Then, at an angle starting at the top of the leaf, I used the edge of the Crushed Olive ink pad to hit the stamp every 1/4 to 1/2 inch all the way down.
 Then I started at the top again only angled the other direction and again, hit the stamp with the edge of the Pealed Paint ink every 1/4 to 1/2 inch all the way down the stamp.
 Stamp onto white or vanilla cardstock...
 Tada...it's plaid!!!!
I entered this in the Really Reasonable Ribbon Challenge #5 to use black and white and a splash of color.
Recipe:
Stamps: Rubbernecker Fall Trilogy and Rubbernecker Floral Silhouettes set #467
Paper: White, Black, Basic Grey's Origins dp
Ink: Mustard Seed, Crushed Olive, Peeled Paint, Memento Tuxedo Black
Accessories: Nestabilities, Silk Ribbon, Pearls, Foam Tape
 This is another stamp I used for the plaid technique....this time instead of hitting the edge of the ink pad on the stamp I lowered the ink pad slightly and used a little more of the ink pad to create a wider plaid look.
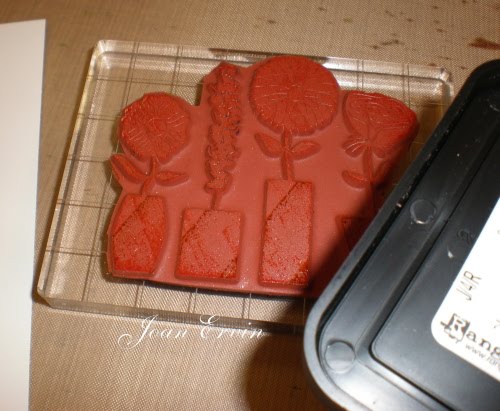 Tap the ink pad first from left to right.....
 and then flip the stamp and tap the ink pad on the stamp from the right to left. You can use as many colors as you want or use only one color...you can still achieve the plaid look.
 I did not use a base color on this one because I lowered the ink pad a little more and color hit the stamp each time I hit the stamp. I used Spiced Marmalade, Warn Lipstick, and Pealed Paint.
 Recipe:
Stamps: Rubbernecker Floral Silhouettes #467
Paper: White, Black, Old Olive, Basic Grey Stella Ruby dp
Ink: Warn Lipstick, Spiced Marmalade, Pealed Paint
Accessories: Lace, Ribbon, Black Rhinestone Flourish, Candy Dots, EK Success Scallop Border Punch
 Can ya tell I am having fun with this technique?? I just had to make one more....
 The base color is Pretty in Pink....then for the plaid lines I used Tempting Turquoise and Certainly Celery. I made the lines with the very edge of the ink pad because it is a real small cake image.
 The second cake uses Pretty in Pink as the base and Regal Rose for the plaid lines.
 Recipe:
Stamps: Rubbernecker's Party Time #442
Paper: White, Basic Grey Lime Ricky dp, Stampin Up! dp
Ink: Tempting Turquoise, Cetainly Celery, Pretty in Pink
Accessories: Ribbon, Nestabilities, Button, Twine

Thanks for visiting and now get out those solid stamps and make a little plaid!!!!


55 comments:
How fun, and what gorgeous results Joan! Thanks so much for sharing your technique!! :)
Thanks for sharing this technique. Very cool & it doesn't look too hard at all! Great looking cards too, Joan!
What a terrific and fun technique, Joan! You are amazing!!
Very interesting, Joan! Hopefully I'll have some time this week to try it out. Thanks for directions.
Awesome cards and technique Joan! I can't wait to give this technique a try.
Way cool!!! This I gotta try:)
What a fantastic technique - and one I have never seen before! I have a huge solid flower stamp that I rarely use, because it is nearly impossible to get even coverage. Now I know what i will try. Thnak you sooo much for this great tutorial.
Fun technique Joan! Off to play!
Great tutorial to share, Joan! I am still challenged even though I saw you do this in person. LOL!
Awesome technique, Joan!!!! Gotta try it!!!
Now THAT is cool! What fun this is.....and all your samples are to die for! You did good! Very nicely done Joan!
What a cool technique, Joan. Took me a bit of practising, but I think I was trying to get my lines too narrow at first. After I took a closer look at yours I stopped worrying so much about precision and just had fun :D.
Hi Sweetie! What a fab idea, and how well explained!! This will be fun........I'm off to try it now!! Hugs!
Great technique and pretty cards-tfs.
Wow, those are so beautiful Joan. Thank you for such a detailed tutorial.
OMG you are a genius, Joan! I cannot wait to try this...I LOVE your projects! The leafy one might be my fave by a teensy weensy bit. I do have silhouette leaf frond images so I am picking that one to try first! Thanks sooo much for this awesome tutorial!
What a great idea Joan! this happens so often - not being able to get good coverage! can't wait to get home from work to try this out!
Very nice! I really like your quick, simple way to add multiple ink colors and create some 'texture' to the image.
Joan, this is FABULOUS!! Simple to do with the a lot of impact on the finished image. Thanks!!
clever! now I need to go find some solid stamps to use.
Awesome tutorial. Thanks for sharing it!
can't wait to give this a try!
Oh my gosh, Joan, what a FABULOUS technique and three wonderful samples. Very cool!!
Thanks - this is wonderful! Love the look.
Sandra
I love this look. I enjoyed the tutorial and will have to try it. All the cards are so pretty. They are all my favorites.
How COOL Joan! AWESOME technique and I LOVE all of your samples! Can't wait to get home and ink up my silhouette stamps!!
Joan, this is a magnificent technique! I can't wait to try it when I get home!!! Thanks so much for sharing it!!!!
well...aren't you entirely too CLEVAH.....fab tutorial..clear instructions AND wow....what beautiful cards...you rock, my friend
Joan this is an AWESOME technique!! Thanks so much for sharing it with us!
What a cool technique Joan! So creative and it has such a neat effect! Great cards!
Fabulous cards Joan! I love, love, love your plaid technique. Thanks for the tutorial.
Joan these are wonderful and your tutorial is awesome! Very pretty cards.
OMGoodness! This is awesome! I love this idea and your tutorial is fantastic! Your cards are just beautiful! Thanks for sharing - Can't wait to try it!
Hey...its my friend Joan!
I saw your black and white card @ SCS!!!!
So glad you took me up on the invitation to join us in Really Reasonable Ribbon's "Black and White" challenge!
Your project is beautiful!
Please bookmark our team's Really Reasonable Ribbon's Ramblings blog or add us to your challenge blog list. We have 2 challenges a month on the 1st and the 15th and would love to have you join us as a regular!
Good luck in the prize drawing!
Hugs,
True :D
Fabby tut, I can't wait to try it myself. Love all three of your cards too.
Very cool technique! Thanks for sharing!
Love this!! Going to try it right now!
Wow - i am certainly going to try this technique when i next use a solid stamp. I tend to give them a wide birth cos they are solid but this makes them usable.
thanks
x Tricia
Love this - and the pink, turquoise and celery reminds me of a favorite plaid skirt I had in High School (too many years ago!)
I can't wait to try this.
Great fun...thank you for sharing .
You are so brilliant, lady!! I remember seeing you do this in Texas!! I was in awe then, and am in awe now! Fabulous tutorial!!
Awesome technique..thanks for the great tutorial!
This is so cool,thank you SOOOO much for sharing,this GREAT technique!!!
I would like to say that this blog really convinced me, you give me best information indeed! Thanks, very good post
I agree with some of your readers and will eagerly look forward to your coming updates. iPhone Application Developers
You are so brilliant, lady!! I remember seeing you do this in Texas!! I was in awe then, and am in awe now! Fabulous tutorial!!
Wow - of course I want to try this technique when I use solid stamps. I prefer to give them a wide birth, because they are solid, but that makes them available.
I'm really impressed with your writing skills and also with the structure for your weblog. Is that this a paid subject or did you customize it yourself? Either way keep up the nice quality writing, it's uncommon to peer a nice blog like this one these days.
.
Here is my web-site :: www.biotechnologyreview.net
These fitness tips in above some basic ideas for keeping fit and healthy body.
The fitness vacation - Whenever vacation is referred to,
most of would think enjoying tropical foods, sitting beside the pool, drinking,
and partying all night. The problem is that many
do not follow through with their fitness plans and
thus fail within the first 3 months of starting a
new fitness plan or routine.
my page: http://alamona.org/index.php?do=/blog/9488/good-guidance-to-help-you-achieve-your-health-and-conditioning-ambitions/
For centuries, man has been exploiting biology to make food products such as
bread, beer, wine, and cheese. Maybe it is arrogant to
want to become a hero, but I find it a noble aspiration. In the manufacturing of food,
pharmaceuticals or cosmetics, assuring quality control is a top-notch priority.
My blog ... Biotechnology and Bioengineering
Bring your favorite magazines to the i - Phone with an i - Phone app.
Talking of the walking dead, congratulations to Hugh
Hefner, who is getting married at age 84 to 24-year-old beauty Crystal Harris.
She married singer Mark Anthony in2005 and released her next album called Rebirth.
Feel free to visit my homepage :: www.cellestytv.com
What's up, I desire to subscribe for this website to get newest updates, therefore where can i do it please help out.
My page: texasveteransforcongress.org
Your payments will not only get to you faster but it will provide you with a history of your earnings for your records.
Men can follow these health and fitness tips to lose weight and get healthy
and fit. ' Being physically active can promote good mental health and help you to manage stress, anxiety and depression.
Feel free to surf to my web blog: click through the up coming post
Way cool! Some very valid points! I appreciate you writing this post and the rest of
the website is really good.
My homepage: http://profitbusinessathome.net
I blog frequently and I really thank you for your information.
This article has truly peaked my interest. I will book
mark your site and keep checking for new information
about once a week. I subscribed to your RSS feed too.
Here is my blog: moodle.cephuelva.org
Post a Comment