Pages

Wednesday, June 30, 2010

Clear Dollar Stamps Sneak Peeks Day Three

Clear Dollar Stamps
Sneak Peeks Day Three


Hello everyone and welcome to Clear Dollar Stamps July Sneak Peeks!!!! All the sets will be available for purchase on July 1. Today I am featuring Goose Hugs - July 2010 Stamp of the Month and Picnic Time.

The Picnic Time table, napkin, basket, food, and bee were all stamped with Memento Rich Cocoa and colored with copics. The napkin, basket, and food were all popped up on dimensionals and glitter was added to the bee's wings. The sentiment and ants were stamped with Memento Tuxedo Black and the diecut grass, Cherry Go Round ribbon, button and twine finish it off. The gingham dp is from Creative Imaginations and Mossy Woods textured cardstock from Clear Dollar Stamps was used for the grass.
The sweet little basket and flowers from Picnic Time were stamped with Memento Tuxedo Black and colored with copics. The Blossom shaped Nestabilities dies were used for the card base and the Pineapple Twist and Mud Pie cardstock (from Clear Dollar Stamps) layers. The sentiment was punched out and attached with dimensionals and silver pearls were added to the flower centers.

This card was made with the adorable Goose Hugs - July Stamp of the Month. The image was colored with copics and the sentiment was sponges while still in the Nestie with So Saffron. The flowers, gold pearls, and Mud Pie ribbon from Clear Dollar Stamps were the finishing touches. The papers used were Mud Pie for the card base, Pineapple Twist for the matting and Basic Grey's Max & Whiskers dp. Sewing was also done in the corners at an angle for a little interest.

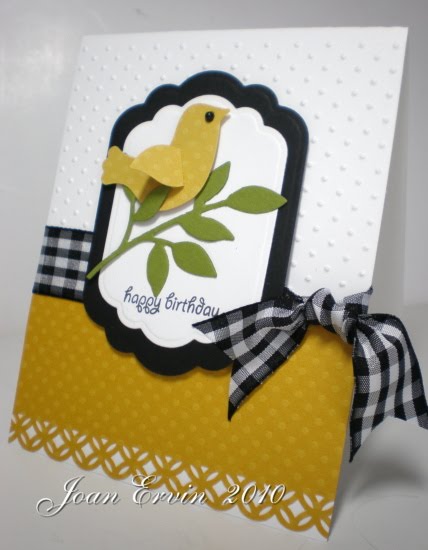
The fun sentiment from Goose Hugs - July 2010 Stamp of the Month was stamped with Memento Tuxedo Black on the white cardstock, cutout with a Nesties, and layered with black and Cherry Go Round cardstock from Clear Dollar Stamps. The background paper is from Imaginisce and the Prima flowers and leaves, Zva Rhinestone Flourish, and the EK Success punched border complete the design. I also added the cute little cracked egg from the same set for a touch of whimsey.

Be sure to check out the other designers sneak peeks...you will find lots of inspiration today!!
Goose Hugs (July SOM) - Tricia, Stacy, Gloria, Joan, Katie, Candy, Laurie
Picnic Time - Joan, Rebecca, Tracy, Sarah G, Kim, Katie, Laurie
Cupful of Happiness - Tricia, Lisa, Gloria, Rebecca, Sarah G, Trudy, Katie, Laurie
Individual Stamps: Pail and Shovel and Life Ring - Laurie and Katie
You will find all the stamp set discriptions on Lori McCroskey's blog, ClearlyI Stamp

Thanks for stopping by...have a great day!!


Tuesday, June 29, 2010

Creative Cuts & More Bridal Set

Hello everyone!! Today will be my last upload as the June Guest Designer for Creative Cuts & More . I have had such an awesome time creating with their wonderful products...thanks, ladies for a great month!!!

Now, I've got to ask.... what would June be without a wedding??? These are just a few of the wonderful diecuts from Creative Cuts & More and they are all just perfect for a June bride!!
The card is a 5x7 size with the little dress cutout window. I added some lace to a piece of scrap white paper and then taped it to the backside of the window. A cover piece will cover the inside. The flower corsage consists of sheer ribbon, silver cording, and the sugared rose from Prima. The Slice Tag Maker heart rims are by Making Memories and the sentiment is from Papertrey Ink's Simple Little Things. A pearl flourish and the silvercording and pearl on the dress finish it off.

The corsage on the cake slice was created like the one on the card. Pearl trim and pearl flourishes were also added to the sides and top. The is the cutest little box that opens in the back and would be perfect for wedding favors or bridal shower treats.

The little dress and tuxedo boxes are just so adorable...wouldn't they look cute as favors on the guests tables, as decorations on the guest book table, or even on the food tables....toooo fun!!!

Thanks for stopping by today.... come back tomorrow for some sneak peeks of the July stamps for Clear Dollar Stamps!!

Sunday, June 27, 2010

Pounded Flowers Technique


Hello everyone.....I am really excited tonight because Holly (Toy) has asked me to sub for her Technique Lover's Challenge on Splitcoast...Whoohoo!!! I decided to challenge everyone to make a project with Pounded Flowers!! You can find a tutorial on the Spellbinder's Blog.

I pressed some pink hydrangeas (they turned out a blue lavender color) on two different pieces of watercolor paper. I watercolored over the pressed flower images on one piece with Regal Rose Reinker for my background layer. The second piece was used to make the cutout flowers. I just cutout around the flower images and used glue dots to layer the pieces. Candy Dots from Taylored Expressions fill the centers.

The sentiment was created by watercoloring a piece of watercolor paper with Regal Rose Reinker and while it was still slightly damp the flower image from Gina K's Spring Florals was stamped with Regal Rose. After the paper was dry, the sentiment from the same set was stamped with Regal Rose. The frame from Nina Bracket's Lovely Labels was sponged with Almost Amethyst, Bordering Blue, and Regal Rose. The edges of the background layer were distressed and the ribbon and pearl flourish finish it off.


This is how I layed out my flowers on the watercolor paper: place the flower fronts face down on the watercolor paper so the centers showed up on the finished product. This is the way you will set the paper on the bottom B plate of the Cuttlebug.


I layed a piece of computer paper over the flowers so the liquid didn't run all over my C plate. Because my plates are old and warped, I used one piece of cardstock for a filler under the bottom B plate and used the C plate on top. You may not need to do this if you plates are is good shape.

Peal the flowers off...you may need to use a soft brush to get rid of pieces of the flower centers.


This is how the watercolor paper looked before I watercolored it with Regal Rose. You can also sponge color on or cover the whole piece with flowers to create your own designer paper! Try different colored flowers and different types for a varied look.

If you don't have a Cuttlebug, Big Shot, or another type of pressing machine, you can use a rolling pin. Just be sure to cover the flowers with waxed paper so you don't stain the rolling pin!!


I found some more flowers I wanted to play with...I may not have any flowers left in my yard by tonight...LOL!!!

This is how I layed them out on the watercolor paper...


The moss roses really left a lot of color!! I watercolored the white areas with Regal Rose Reinker, layered with Almost Amethyst, sewed around the edges and then distressed both the watercolored layer and the matting.

The finished card features a sentiment from Rubbernecker's Wildflowers set #465, Prima leaves and flowers, a scalloped border, pink wire mesh (and the cream Primas) from Stampers Dream, and the long clear and white sparkly thingys from Taylored Expressions.

Recipe:
Stamps: Rubbernecker Wildflower Set #465
Paper: Watercolor paper, Almost Amethyst, Vanilla, K&Co. La Boutique dp
Ink: Memento Tuxedo Black, Regal Rose, Almost Amethyst
Accessories: Primas, Leaves, Pink Wire Mesh, Spellbinders Scalloped Die, Pink Crystal Leaves, Nestabilities, Pearls, Sewing Machine, Sheer Ribbon

Thanks for stopping by and I hope you have fun creating with this fun challenge!!!

Saturday, June 26, 2010

Stampin Saturday!!

Hello everyone and happy Saturday!!!! I headed into the craft room bright and early this morning to make a card for the Inspiration Challenge on Splitcoast. Stef picked a really cool site called The Bicycle Muse for us and I found inspiration in this pretty little red and white bag. I used a piece of red and cream dp from Webster's Pages Seaside Retreat collection and several stamps from Rubbernecker. The images were all stamped with Ruby Red, cutout, and attached with dimensionals. The sentiment, also from Rubbernecker, was stamped over a sea coral image that was stamped off 3 times. It was then cutout with a Nesties and layered on a Spellbinders fancy scalloped diecut. The sheer ribbon and pearls finish it off.
Recipe:
Stamps: Rubbernecker
Paper: Vanilla, PTI Pure Poppy , Webster's Pages Seaside Retreat
Ink: Ruby Red
Accessories: Pearls, Ribbon, Nestabilities, Spellbinders Dies, Dimensionals, Foam Tape, Sewing Machine

I made this card for the Queen for the Day #15 challenge hosted by Anne Ryan on Splitcoast to honor none other that the Rubbernecker DT coordinator, Kittie (kittie747)...Whoohoo!!! Have you ever seen such a fabulous gallery!!!! Kittie is such a master at creating scenes that I know I wouldn't do her justice there so I found this beautiful flower card called F4A10 May Day Flowers .
I kept the same basic layout with a few changes, the same colors, and flower stamps from Rubbernecker. I colored the stamps with Regal Rose and Old Olive markers and stamped on white cardstock. I layered the flower panel on a piece of flowered Basic Grey Porcelain paper and sewed around the edges. I used a Martha Stewart Border Punch instead of the Stampin Up! one Kittie used on her card and added the butterflies with silver pearls. This is also for this weeks challenge on the Joan's Garden Blog to use a Martha Stewart Border Punch and Corner Punch along with flowered paper. Do you see the little pink thingy at the left of the bow...that's a punched corner I made with the MS Corner Punch.
Recipe:
Stamps: Rubbernecker Florals
Paper: White, Regal Rose, Basic Grey Porcelain
Ink: Regal Rose and Old Olive Markers
Accessories: Ribbon, Martha Stewart Corner, Border, and Butterfly punches, Silver Pearls, Sewing Machine, Foam Tape

Thanks for stopping by today...hope you enjoy yor weekend!!!

Friday, June 25, 2010

You're so Tweet!!

Hello everyone!!! I have been working in the yard early in the morning because by 10:00 it's already in the high 90's and remember those tomato plants I told you about?? The birds found them and pecked holes is several...GRRRRR!!!! I threw a couple of sheets over them so I hope that keeps those pesky old birds away!!!

I found some time yesterday afternoon to play along in the Ways to Use it Challenge on Splitcoast. The challenge was to use heat embossing...I have not embossed anything for quite a while!!! I used Ranger Tinsel Embossing powder on the frame and the chipboard button was embossed with white opaque ep. The birdhouse and the tiny birds from Clear Dollar Stamps A Tweet Hello set were colored with copics and I did a little sewing along the sides.
Recipe:
Stamps: Clear Dollar Stamps A Tweet Hello
Paper: White, Stampin Up! dp
Ink: Memento Tuxedo Black
Accessories: Nestabilities, Ranger Tinsel ep, White Opaque ep, Sewing Machine, EK Success Scalloped Border Punch, Ribbon, Die-namics Ric Rac Die


Thanks for stopping by this morning...Mom and I are going to the grocery store a little later. I'm all out of chocolate and that makes for a very cranky stamper...LOL!!!!

Wednesday, June 23, 2010

Creative Belli Challenge #94

Good morning everyone and welcome to another Creative Belli Challenge!!! The challenge this 2 weeks is a sketch with a patriotic theme. Be sure to use something old and forgotten from your stash...the Belli Challenge is all about using your old stuff and forgotten treasures!!!

My card uses the beautiful We Are Memory Keepers dp along with the retired Stampin Up! set called Star-Spangled Banner (unloved and unused since last year!!). I used markers to color the stamp and then stamped it on vanilla cardstock. The sentiment is from a part of another stamp from the same set and the punched stars, buttons, floss and ribbon finish it off. My floss is over 20 years old...I guess that qualifies for old and forgotten...LOL!!!

This is also for a few other challenges:

1. Kah-Wink-E-Dink - free for all
2. Incy Wincy - music (I have musical notes on the background paper)
3. Lexi's Creations - something old (my floss)
4. Wednesday Stamper - Love something.....I love the USA!!!
5. MelJen's Designs - ribbon
6. The Crazy Challenge - You are a Star
7. Tangled Up in Creativity Challenge - red/white/blue

Be sure to visit the Creative Belli Design Team Member's blogs to read more details about their designs. You will find lots of awesome ideas!!! If you upload a card to Splitcoast or PCP, be sure to add CBC94 in the keywords section

Chris Dickinson
Ceal Pritchett
Holly Brown
Anne Harmon
Debbie Daniels
Robin Kirkpatrick
Dani Marcus
Jessica Stockmeyer
Shelly Schmidt
Liz Williams
Maria Matter
Darsie Bruno
Melisa Waldorf
Joy Hadden

Thanks so much for stopping by....have a great day!!


Tuesday, June 22, 2010

Planes and Trains

Good morning everyone...what a great day to do a little stamping!!! It's almost noon and I am still in my pj's....I just love reitrement!!!

Today's Color Challenge colors on Splitcoast are Soft Suede, Apricot Appeal, and Almost Amethyst...who woulda thought this combo would look sooo good!! Betty, you are a genius!!!

This is also for da Mudder's Teapot Tuesday challenge...it seems we are going to Byrdellas birthday party in California. I chartered this adorable little plane by Rubberneker Stamps so if anyone else needs a ride, just let me know!! I have a few little birds following me so I hope they can come to the party, too!! Not sure I want to get on that train but I'll do it to get out of the rain!!!
I used Mercy's Tuesday Sketch, the cloud Die-namics from MFT's, and the buttons finish it off.
Recipe:
Stamps: Rubbernecker Stamps
Paper: White, Almost Amethyst, Soft Suede, K&Co. Itsy Bitsy dp
Ink: Memento Rich Cocoa
Accessories: Buttons, Martha Stewart Twine, Dotted Swiss Folder, Die-Mamics Cloud Die, Copics

I was sooo excited to see my friend Pam Hooton (Iris) as Featured Stamper on Splitcoast Sunday...have you ever seen such a gorgeous gallery of vintage shabby chic designs???!!!??? Missy Piris...you are my ideal!!! I love every single card you have ever made!!!!!

I chose to case Pam's CSSC93 peek inside card (not that my humble card could ever compare to hers). I kept the same basic layout and shabby design but changed the stamps to Clear Dollar Stamps Scripture Children, changed the colors, papers, and frame. The distressed frame came from a yard sale box of goodies I found last week....don't ya love it when you find a box of treasures!!!
Recipe:
Stamps: Clear Dollar stamps Scripture Children
Paper: White, K&Co. Itsy Bitsy
Ink: Bashful Blue
Accessories: Buttons, Twine, Scalloped Edge Die-namics, Pom Pom Trim, Lace, Silk Roses, Frame, Ribbon, Nestabilities


Thanks for visiting today....now I better get in the shower before someone knocks on the door!!!

Sunday, June 20, 2010

Happy Father's Day!!!

Good morning everyone.....have you wished the wonderful men in your life Happy Father's Day?? I made cards for my father, husband, three sons, and one son-in-law last night after all the kiddos went home.
This card is for my wonderful husband, George...he is such a great dad to all our children!!
The images from Flourishes A Guiding Light set from Stampers Dream were stamped with Vivid's Aqua ink on the Pure Luxury Ocean Mist cardstock. The sailor's knot at the bottom was stamped with Creamy Caramel on the Pure Luxury Kraft and the the pearls and twine finish it off.
Recipe:
Stamps: Flourishes A Guiding Light
Paper: Pure Luxury Ocean Mist and Kraft, Close to Cocoa
Ink: Vivid Aqua, Creamy Caramel
Accessories: Twine, Pearls
I made this one for our son, David...together Stacy and David have six children!! The sweet Popcorn the Bear image was colored with copics and attached to Baja Breeze and Pure Luxury Chocolate Brown cardstock. Since David is on the go constantly, I thought this card would be perfect for Father's Day!!

This is for my son-in-law John.....Holly and John have two four legged children and they love them dearly!! John is a wonderful cook and barbecuer (is that a word??) so when I saw this adorable stamp set, I knew it would be perfect for John!!! The images from Inky Antics BBQ Time set were colored with copics, cutout with Nestabilities, and attached with dimensionals. The patriotic ribbon is the only embellie.
Thanks for visiting this morning.....I'm off to shower and get ready for church. We are going to do lunch with Mom and Dad and then deliver cards to our boys....have a great day!!!


Thursday, June 17, 2010

North Texas Shoebox Swap Photos

Hello everyone....hope all is well in your little corner of the world!!! We got back from the North Texas Shoebox Swap Sunday afternoon ......we had such a wonderful time!!!! Three of my grandchildren came to stay with us as soon as we got home and we have not stopped going since then!!! This old grandma is pooped!!! We have gone swimming, shopping, to the movies, visiting with my parents, dinners with other family, and this afternoon we are going to the planetarium. Needless to say, stamping will have to wait till they go home!! I do have some pictures of the wonderful stampers and cards from the swap....... Four of the Belli Girls were at the swap....Joy Hadden, Debbie Daniels, Me, and my DD Holly Brown.
Stamping royalty here: Lydia Fiedler, Susan Liles, Jen de Muro, and Bev Gerard

My table mates included Joy, Holly, and Joy's sister, Debbie.


This is the card I designed for the swap...we had to create something that could be put together in 10 minutes or less...now, that was tricky!!! In my infinite wisdom, I thought that I would have more diecuts than stamping to save time...little did I realize how much time would be spent turning the crank on the old cuttlebug...yikes!!! My arm will never be the same...LOL!!! I made 40 packets with all the pieces to this card...that's a lotta diecuts!!!

This was my favorite card...I don't know who designed it but they did a fabulous job!!!

This is a Farkle card...I have never played Farkle but it sure sounds fun!! The card in the slot pulls out so you can get to the dice....tooo cute!!!

I added pictures of the cards we made...all of them were just gorgeous!!! I left some of the sentiments off so I could add one when needed. Looks like I have birthday cards for a few months!!!


Thanks for stopping by today.....have a good one!!!! Now to gather the troups for a quick lunch and off we go!!!

Sunday, June 13, 2010

Creative Cuts & More Blog Hop Celebrating Summer, BBQ's and July 4th!!

Hello everyone and welcome to the Creative Cuts and More Blog Hop to celebrate Summer, BBQ's, and July 4th!!! Terry (the owner of CC&M) has over 100 brand new die cuts in the store and we are going to show off some of them throughout this blog hop. The hop starts at the Die Cut Diva Blog. The official start time for the hop is Monday, June 14, at 8:00 AM (EST). If you arrived early, please be patient as all the links may not be live yet.

What better way to celebrate our Nation's birthday than with cards and projects to get you inspired!!! My first card features the Kraft Scalloped bottom 5x7 card. The flag stamp from the Stampin Up! set called Star-Spankled Banner was colored on the stamp with markers and stamped onto vanilla cardstock. Creative Imaginations paper was used for the layers and Papertrey Ink ribbons, buttons, and punched stars finish it off.

I used the the Box with Handles and Layers set in Huckleberry Blue. I left the top open and added all the fun 4th of July stars, flags, and ribbons. The picks were threaded through the handles and flaps to secure them in place. The round images on the sides are stickers from Creative Impressions.
Be sure to start the hop at the Die Cut Diva Blog .....If you have come from Kayla's blog you are on the right track...weren't her projects fabulous!!!! If not, hop on back to the Die Cut Diva's Blog...you don't want to miss what our designers have in store for you!
The next stop on our hop is Chris...she has some amazing projects to share!!!
Joan - you are here!!